Mastering Henna: Your Expert Guide on How to Draw a Henna Tattoo
Intrigued by the intricate beauty of henna tattoos and eager to create your own stunning designs? You’ve come to the right place. This comprehensive guide will take you from novice to confident henna artist, providing a deep understanding of the art form, the tools involved, and the techniques needed to achieve professional-looking results. We’ll explore everything from selecting the right henna paste to mastering intricate patterns, ensuring your henna journey is both enjoyable and successful. Our goal is to provide a trustworthy resource based on years of experience and best practices in the henna art community, empowering you to express your creativity with confidence.
Understanding the Art of Henna Tattooing
Henna tattooing, also known as mehndi, is a centuries-old art form with roots in South Asia, the Middle East, and Africa. It involves applying a paste made from the henna plant to the skin, creating temporary, yet beautiful, designs. The color of the stain, typically reddish-brown, darkens over 24-48 hours as the henna oxidizes. While often associated with celebrations like weddings and festivals, henna art is increasingly popular as a form of personal expression.
Unlike permanent tattoos, henna stains only the top layer of skin, gradually fading as the skin naturally exfoliates. This makes it a safe and temporary way to adorn the body with intricate artwork. Understanding the cultural significance and respecting the traditions associated with henna is crucial before embarking on your henna journey.
The Science Behind the Stain
The active ingredient in henna is lawsone, a molecule that binds to the proteins in skin, hair, and nails. The concentration of lawsone, the quality of the henna powder, and the application technique all influence the final stain color. Factors like skin type, body temperature, and aftercare also play a role. High-quality henna powder yields a darker, longer-lasting stain.
Essential Tools and Materials for Henna Tattooing
Creating stunning henna tattoos requires the right tools and materials. Investing in quality supplies will significantly impact your results and overall experience.
- Henna Powder: Opt for body art quality (BAQ) henna powder, which is finely sifted and free from impurities.
- Essential Oils: Certain essential oils, such as lavender, cajeput, or tea tree, enhance the henna stain. They help release the lawsone molecules, resulting in a darker color.
- Mixing Bowl and Spoons: Use non-reactive materials like glass or plastic.
- Applicator Bottles or Cones: These allow for precise application. Pre-made cones are convenient, but making your own allows for customization.
- Transfer Paper and Stencils: Helpful for beginners or for intricate designs.
- Sealant: A mixture of lemon juice and sugar helps keep the henna paste moist and adhered to the skin.
- Gloves: Protect your hands from staining while mixing and applying henna.
- Paper Towels: For cleaning up spills and wiping the applicator tip.
Step-by-Step Guide: How to Draw a Henna Tattoo
Now, let’s dive into the practical steps of creating your own henna tattoo.
1. Preparing the Henna Paste
Mixing the henna paste is a crucial step that requires precision. Follow these instructions carefully:
- Sift the Henna Powder: Use a fine-mesh sieve to remove any clumps and ensure a smooth paste.
- Add Essential Oil: Gradually add the essential oil to the henna powder, mixing well until it resembles wet sand. Typically, use 15-30ml of essential oil per 100g of henna powder.
- Add Liquid: Slowly add lemon juice or distilled water, mixing continuously until you achieve a smooth, yogurt-like consistency. Avoid adding too much liquid, as this will make the paste runny.
- Let it Dye Release: Cover the bowl tightly and let the paste sit at room temperature for 12-24 hours. This allows the lawsone molecules to be released, resulting in a stronger stain.
- Check the Dye Release: After the resting period, check the paste for dye release. The surface should have a dark, brownish tint.
- Adjust Consistency: If the paste is too thick, add a few drops of liquid. If it’s too thin, add a small amount of henna powder.
- Strain the Paste: Strain the paste through a nylon stocking or fine mesh to remove any remaining clumps or particles. This will prevent clogging in the applicator.
2. Preparing the Skin
Proper skin preparation is essential for optimal henna stain development.
- Cleanse the Skin: Wash the area with soap and water to remove any oils, lotions, or dirt.
- Exfoliate (Optional): Gently exfoliate the skin to remove dead skin cells and promote better henna absorption.
- Avoid Lotions and Oils: Do not apply any lotions or oils to the skin before applying henna.
3. Applying the Henna Design
This is where your creativity comes to life! There are several ways to transfer your design to the skin.
Using Stencils or Transfer Paper
- Select Your Design: Choose a stencil or create your own design on transfer paper.
- Apply the Stencil: Carefully position the stencil on the skin and secure it with tape.
- Apply Henna Paste: Fill in the stencil with henna paste, ensuring even coverage.
- Remove the Stencil: Gently remove the stencil, being careful not to smudge the design.
Freehand Application
- Practice on Paper: Before applying henna to the skin, practice your design on paper to get a feel for the applicator and the flow of the paste.
- Start with Simple Shapes: Begin with basic shapes like dots, lines, and curves.
- Apply Even Pressure: Maintain consistent pressure on the applicator to create uniform lines.
- Work Slowly and Deliberately: Take your time and focus on precision.
4. Aftercare for a Darker, Longer-Lasting Stain
Proper aftercare is crucial for achieving a rich, dark stain that lasts.
- Keep the Paste Moist: Apply a sealant (lemon juice and sugar mixture) every 15-20 minutes to keep the henna paste moist and adhered to the skin.
- Wrap the Area (Optional): Wrapping the area with medical tape or a bandage helps retain heat and moisture, resulting in a darker stain.
- Avoid Water Contact: Keep the henna paste dry for as long as possible, ideally 2-6 hours. Water can hinder the staining process.
- Scrape Off the Paste: Once the paste is dry, gently scrape it off. Avoid washing it off with water.
- Apply Natural Oil: After removing the paste, apply a natural oil like coconut oil or olive oil to moisturize the skin and protect the stain.
- Avoid Harsh Soaps and Exfoliants: Avoid using harsh soaps or exfoliants on the area for at least 24 hours.
- Keep the Area Warm: Warmth enhances the stain.
Mastering Henna Designs: From Basic Shapes to Intricate Patterns
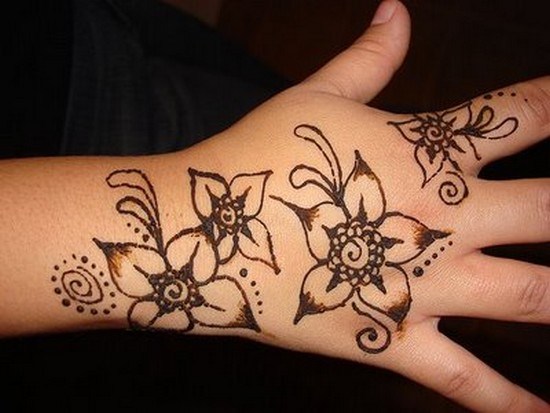
Henna designs range from simple geometric patterns to elaborate floral motifs. Mastering basic shapes is essential for creating more complex designs.
- Dots: Use dots to create accents, borders, or fill in spaces.
- Lines: Vary the thickness of lines to add dimension and interest.
- Curves: Practice creating smooth, flowing curves.
- Swirls: Combine curves to create elegant swirls.
- Floral Motifs: Learn to draw basic flower shapes like petals, leaves, and stems.
- Paisley Patterns: Paisley designs are a classic element in henna art.
- Geometric Patterns: Incorporate geometric shapes like triangles, squares, and circles.
Troubleshooting Common Henna Tattooing Problems
Even with careful preparation and application, you may encounter some challenges. Here’s how to troubleshoot common problems:
- Faint Stain: Ensure you are using high-quality henna powder and fresh essential oils. Also, make sure the paste is properly dye-released and that you are following the aftercare instructions.
- Uneven Stain: This could be due to inconsistent paste consistency or uneven application. Practice applying even pressure on the applicator.
- Smudging: Avoid touching or rubbing the henna paste while it’s drying. Use a sealant to help keep the paste in place.
- Clogged Applicator: Strain the henna paste thoroughly to remove any clumps or particles. Use a needle to unclog the tip of the applicator.
- Allergic Reaction: While rare, some people may be allergic to henna or certain essential oils. Always do a patch test before applying henna to a large area of skin.
Understanding the Safety of Henna and Black Henna Dangers
It’s crucial to be aware of the potential risks associated with henna tattoos, particularly “black henna.”
Natural Henna: Natural henna is derived from the henna plant (Lawsonia inermis) and produces a reddish-brown stain. It is generally considered safe when used properly.
Black Henna: Black henna is often used to create darker, more dramatic designs. However, it typically contains a chemical dye called paraphenylenediamine (PPD), which can cause severe allergic reactions, skin blistering, permanent scarring, and even chemical sensitivity. Avoid black henna at all costs.
Always ask about the ingredients used in the henna paste before getting a tattoo. If you are unsure, it’s best to err on the side of caution and avoid the tattoo altogether. Reputable henna artists will always use natural henna and be transparent about their ingredients.
Henna for Special Occasions: Weddings, Festivals, and Celebrations
Henna plays a significant role in many cultural celebrations, particularly weddings and festivals. In South Asian weddings, the mehndi ceremony is a joyous occasion where the bride and her female relatives and friends adorn their hands and feet with intricate henna designs. The designs often symbolize good luck, prosperity, and happiness.
During festivals like Eid and Diwali, henna is applied to celebrate and express joy. The designs often feature festive motifs and symbols. Whether you’re celebrating a special occasion or simply expressing your personal style, henna is a beautiful and meaningful way to adorn the body.
Henna’s Enduring Appeal: A Timeless Art Form
The art of henna tattooing continues to captivate and inspire people around the world. Its versatility, beauty, and cultural significance have made it a timeless art form. By understanding the history, techniques, and safety precautions associated with henna, you can confidently create your own stunning designs and experience the joy of this ancient art form. From simple designs to intricate works of art, the possibilities are endless. So, gather your supplies, unleash your creativity, and embark on your henna journey today!
